Installation
Helm or kubectl.Kyverno can be installed using Helm or deploying from the YAML manifests directly. When using either of these methods, there are no other steps required to get Kyverno up and running.
Note
As of v1.4.0, Kyverno supports multiple replicas for increased scale and availability.Compatibility Matrix
| Kyverno Version | Kubernetes Min | Kubernetes Max |
|---|---|---|
| 1.2.1 | 1.14 | 1.17 |
| 1.3.0 | 1.16 | 1.20* |
| 1.4.x | 1.16 | 1.21 |
| 1.5.x | 1.16 | 1.21 |
| 1.6.x | 1.16 | 1.23.3 |
* Kyverno CLI 1.3.0 supports up to Kubernetes 1.18.
Install Kyverno using Helm
Kyverno can be deployed through a Helm chart which is accessible either through the Kyverno repo or on ArtifactHub. As of Kyverno 1.3.2, the Helm chart also by default installs the default profile of the Pod Security Standards policies available here.
In order to install Kyverno with Helm, first add the Kyverno Helm repository.
1helm repo add kyverno https://kyverno.github.io/kyverno/
Scan the new repository for charts.
1helm repo update
Use Helm 3.2+ to create a Namespace and install Kyverno.
1helm install kyverno kyverno/kyverno --namespace kyverno --create-namespace
Beginning with Kyverno 1.5.0, Kyverno Helm chart v2.1.0, the Kyverno policies must be added separately and after Kyverno is installed.
1helm install kyverno-policies kyverno/kyverno-policies --namespace kyverno
To install non-stable releases, add the --devel switch to Helm.
1helm install kyverno kyverno/kyverno --namespace kyverno --create-namespace --devel
2helm install kyverno-policies kyverno/kyverno-policies --namespace kyverno --devel
For Helm versions prior to 3.2, create a Namespace and then install the Kyverno Helm chart.
1kubectl create namespace kyverno
2helm install kyverno kyverno/kyverno --namespace kyverno
3helm install kyverno-policies kyverno/kyverno-policies --namespace kyverno
Note
For all of the flags available during a Helm installation of Kyverno, see here. To disable the automatic installation of the default Pod Security Standard policies, setpodSecurityStandard to disabled.
Install Kyverno using YAMLs
If you’d rather deploy the manifest directly, simply apply the release file.
This manifest path will always point to the latest main branch.
1kubectl create -f https://raw.githubusercontent.com/kyverno/kyverno/main/config/install.yaml
You can also pull from a release branch to install the stable releases including release candidates.
1kubectl create -f https://raw.githubusercontent.com/kyverno/kyverno/release-1.5/definitions/release/install.yaml
Customize the installation of Kyverno
The picture below shows shows a typical Kyverno installation:
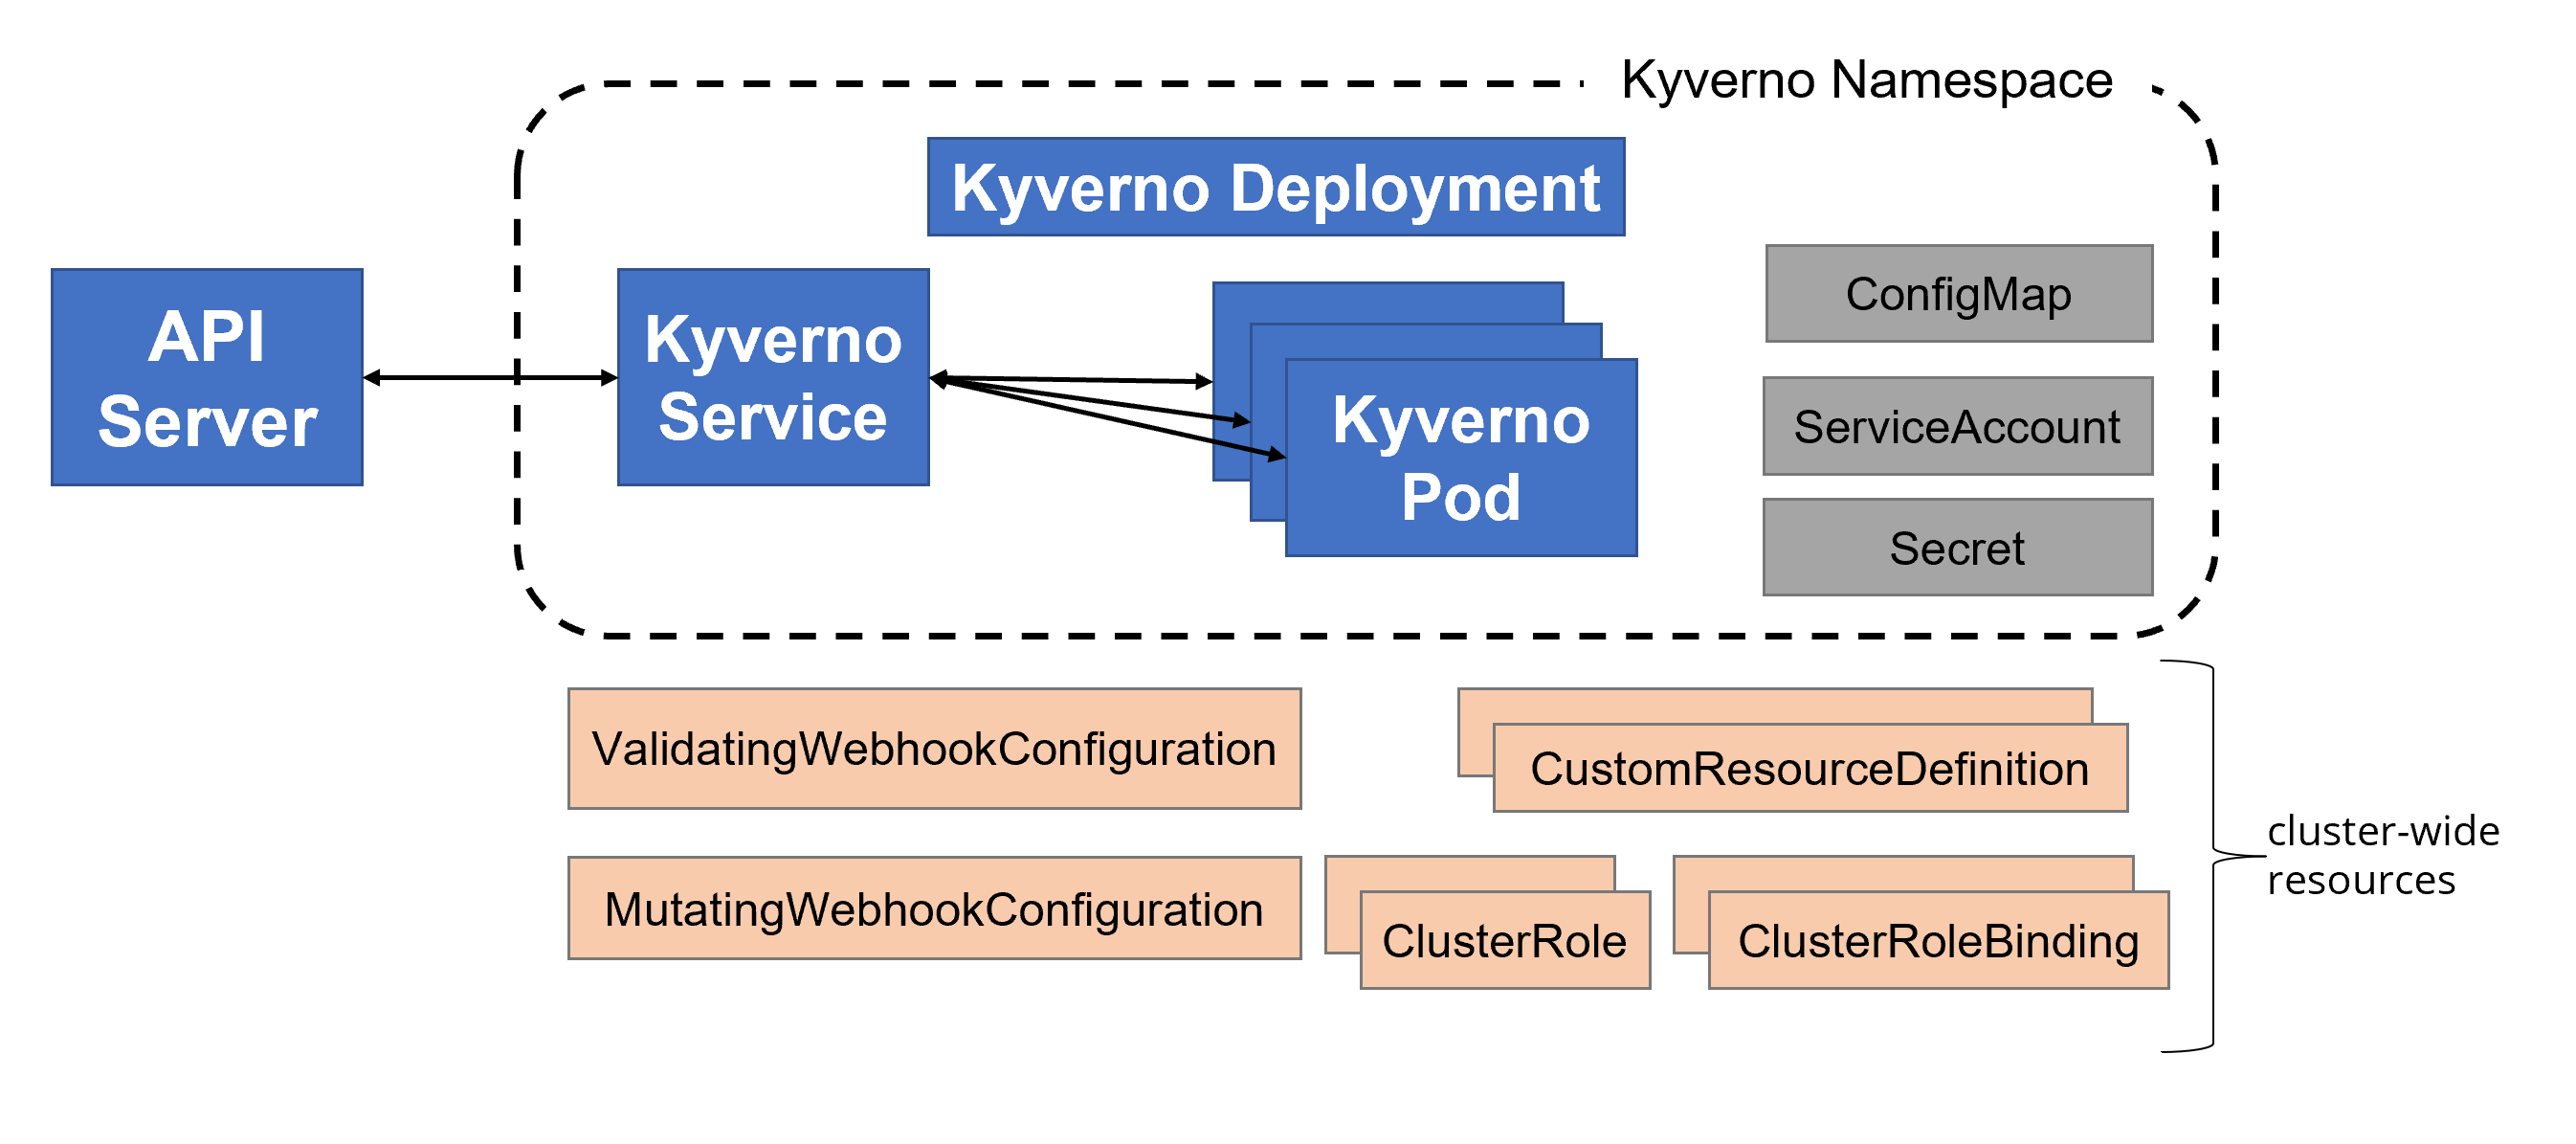
If you wish to customize the installation of Kyverno to have certificates signed by an internal or trusted CA, or to otherwise learn how the components work together, follow the below guide.
Installing a specific version
To install a specific version, download install.yaml and then change the image tag.
e.g., change image tag from latest to the specific tag v1.3.0.
1spec:
2  containers:
3    - name: kyverno
4      # image: ghcr.io/kyverno/kyverno:latest
5      image: ghcr.io/kyverno/kyverno:v1.3.0
To install in a specific namespace replace the namespace “kyverno” with your namespace.
Example:
1apiVersion: v1
2kind: Namespace
3metadata:
4  name: <namespace>
1apiVersion: v1
2kind: Service
3metadata:
4  labels:
5    app: kyverno
6  name: kyverno-svc
7  namespace: <namespace>
and in other places (ServiceAccount, ClusterRoles, ClusterRoleBindings, ConfigMaps, Service, Deployment) where Namespace is mentioned.
Alternatively, use Kustomize to replace the Namespace.
To run Kyverno:
1kubectl create -f ./install.yaml
To check the Kyverno controller status, run the command:
1kubectl get pods -n <namespace>
If the Kyverno controller is not running, you can check its status and logs for errors:
1kubectl describe pod <kyverno-pod-name> -n <namespace>
1kubectl logs -l app=kyverno -n <namespace>
Certificate Management
The Kyverno policy engine runs as an admission webhook and requires a CA-signed certificate and key to setup secure TLS communication with the kube-apiserver (the CA can be self-signed). There are two ways to configure secure communications between Kyverno and the kube-apiserver.
Option 1: Auto-generate a self-signed CA and certificate
Kyverno can automatically generate a new self-signed Certificate Authority (CA) and a CA signed certificate to use for webhook registration. This is the default behavior when installing Kyverno.
1## Install Kyverno
2kubectl create -f https://raw.githubusercontent.com/kyverno/kyverno/main/config/release/install.yaml
Note
The above command installs the last released version of Kyverno, which may not be stable. If you want to install a different version, you can edit theinstall.yaml file and update the image tag.
Also, by default Kyverno is installed in the “kyverno” namespace. To install it in a different namespace, you can edit install.yaml and update the namespace.
To check the Kyverno controller status, run the command:
1## Check pod status
2kubectl get pods -n <namespace>
If the Kyverno controller is not running, you can check its status and logs for errors:
1kubectl describe pod <kyverno-pod-name> -n <namespace>
1kubectl logs <kyverno-pod-name> -n <namespace>
Option 2: Use your own CA-signed certificate
Note
There is a known issue with this process. It is being worked on and should be available again in a future release.You can install your own CA-signed certificate, or generate a self-signed CA and use it to sign a certificate. Once you have a CA and X.509 certificate-key pair, you can install these as Kubernetes secrets in your cluster. If Kyverno finds these secrets, it uses them. Otherwise it will request the kube-controller-manager to generate a certificate (see Option 1 above).
2.1. Generate a self-signed CA and signed certificate-key pair
Note
Using a separate self-signed root CA is difficult to manage and not recommended for production use.If you already have a CA and a signed certificate, you can directly proceed to Step 2.
Here are the commands to create a self-signed root CA, and generate a signed certificate and key using OpenSSL (you can customize the certificate attributes for your deployment):
- Create a self-signed CA
1openssl genrsa -out rootCA.key 4096
2openssl req -x509 -new -nodes -key rootCA.key -sha256 -days 1024 -out rootCA.crt  -subj "/C=US/ST=test/L=test /O=test /OU=PIB/CN=*.kyverno.svc/emailAddress=test@test.com"
- Create a keypair
1openssl genrsa -out webhook.key 4096
2openssl req -new -key webhook.key -out webhook.csr  -subj "/C=US/ST=test /L=test /O=test /OU=PIB/CN=kyverno-svc.kyverno.svc/emailAddress=test@test.com"
- Create a
webhook.extfile with the Subject Alternate Names (SAN) to use. This is required with Kubernetes 1.19+ and Go 1.15+.
subjectAltName = DNS:kyverno-svc,DNS:kyverno-svc.kyverno,DNS:kyverno-svc.kyverno.svc
- Sign the keypair with the CA passing in the extension
1openssl x509 -req -in webhook.csr -CA rootCA.crt -CAkey rootCA.key -CAcreateserial -out webhook.crt -days 1024 -sha256 -extfile webhook.ext
- Verify the contents of the certificate
1 openssl x509 -in webhook.crt -text -noout
The certificate must contain the SAN information in the X509v3 extensions section:
X509v3 extensions:
    X509v3 Subject Alternative Name:
        DNS:kyverno-svc, DNS:kyverno-svc.kyverno, DNS:kyverno-svc.kyverno.svc
2.2. Configure secrets for the CA and TLS certificate-key pair
You can now use the following files to create secrets:
rootCA.crtwebhooks.crtwebhooks.key
To create the required secrets, use the following commands (do not change the secret names):
1kubectl create ns <namespace>
2kubectl create secret tls kyverno-svc.kyverno.svc.kyverno-tls-pair --cert=webhook.crt --key=webhook.key -n <namespace>
3kubectl annotate secret kyverno-svc.kyverno.svc.kyverno-tls-pair self-signed-cert=true -n <namespace>
4kubectl create secret generic kyverno-svc.kyverno.svc.kyverno-tls-ca --from-file=rootCA.crt -n <namespace>
Note
The annotation on the TLS pair secret is used by Kyverno to identify the use of self-signed certificates and checks for the required root CA secret.| Secret | Data | Content |
|---|---|---|
kyverno-svc.kyverno.svc.kyverno-tls-pair |
rootCA.crt | root CA used to sign the certificate |
kyverno-svc.kyverno.svc.kyverno-tls-ca |
tls.key & tls.crt | key and signed certificate |
Kyverno uses secrets created above to setup TLS communication with the kube-apiserver and specify the CA bundle to be used to validate the webhook server’s certificate in the admission webhook configurations.
This process has been automated for you with a simple script that generates a self-signed CA, a TLS certificate-key pair, and the corresponding Kubernetes secrets: helper script
2.3. Install Kyverno
You can now install Kyverno by downloading and updating install.yaml, or using the command below (assumes that the namespace is “kyverno”):
1kubectl create -f https://raw.githubusercontent.com/kyverno/kyverno/main/config/release/install.yaml
Roles and Permissions
Kyverno creates several roles and role-bindings, some of which need to be customized to allow access to sensitive cluster-wide resources.
Roles
Kyverno requires the following permissions:
- create and update select resources in its namespace (e.g.
Leaseused for leader elections) and some cluster-wide resources (e.g.ValidatingWebhookConfigurationused for registering and managing webhooks). - create, update, delete, get, list, and watch Kyverno custom resources such as
ClusterPolicy. - view, list, and watch resources to apply validation policy rules during background scans.
- create, update, delete, get, list, and watch resources managed via generate policy rules.
Kyverno creates the following roles that are bound to the kyverno-service-account
Tip
Use"kubectl get clusterroles,roles -A | grep kyverno" to view all Kyverno roles.
Cluster Roles
The following ClusterRoles provide Kyverno with permissions to policies and other Kubernetes resources across all namespaces:
kyverno:policies: manage policy custom resourceskyverno:view: view all resourceskyverno:generate: create, update, and delete resources via generate policy ruleskyverno:events: create, update, and delete events for policy resultskyverno:userinfo: query cluster-wide roles and role-binding configurations to build variables with role information.
For each ClusterRole a ClusterRoleBinding with the same name as the ClusterRole is used to bind the permissions to the kyverno-service-account.
Namespaced Roles
The following Roles provide Kyverno with permissions to manage select resources in the Kyverno namespace:
kyverno:leaderelection: manage leases for leader election across replicaskyverno:webhook: manage webhook configurations in the Kyverno namespace.
For each Role a RoleBinding with the same name as the Role is used to bind the permissions to the kyverno-service-account.
Role aggregators
The following ClusterRoles are used to extend the default admin role with permissions to view and manage policy resources via role aggregation:
kyverno:admin-policies: allowadminrole to manage Policies and ClusterPolicieskyverno:admin-policyreport: allowadminrole to manage PolicyReports and ClusterPolicyReportskyverno:admin-reportchangerequest: allowadminrole to manage ClusterReportChangeRequests and ClusterReportChangeRequests
Customizing Permissions
The default kyverno:view and kyverno:generate can be customized.
For example, if a CustomResource is added to the cluster the configured roles can be extended to allow Kyverno permissions to generate and/or mutate the new resource type. Or, new ClusterRole/Role and ClusterRoleBinding/RoleBinding pairs can be created and mapped to the Kyverno service account.
This sample configuration provides Kyverno additional permissions to generate clusterroles and clusterrolebindings:
 1---
 2apiVersion: rbac.authorization.k8s.io/v1beta1
 3kind: ClusterRole
 4metadata:
 5  name: kyverno:generate-roles
 6rules:
 7- apiGroups:
 8  - "*"
 9  resources:
10  - clusterroles
11  - clusterrolebindings
12  verbs:
13  - create
14  - update
15  - delete
16  - list
17  - get
18---
19kind: ClusterRoleBinding
20apiVersion: rbac.authorization.k8s.io/v1
21metadata:
22  name: kyverno:generate-roles
23roleRef:
24  apiGroup: rbac.authorization.k8s.io
25  kind: ClusterRole
26  name: kyverno:generate-roles
27subjects:
28- kind: ServiceAccount
29  name: kyverno-service-account
ConfigMap Flags
The following flags are used to control the behavior of Kyverno and must be set in the Kyverno ConfigMap.
excludeGroupRole: excludeGroupRole role expected string with comma-separated group role. It will exclude all the group role from the user request. Default we are usingsystem:serviceaccounts:kube-system,system:nodes,system:kube-scheduler.excludeUsername: excludeUsername expected string with comma-separated kubernetes username. In generate request if user enableSynchronizein generate policy then only kyverno can update/delete generated resource but admin can exclude specific username who have access of delete/update generated resource.resourceFilters: Kubernetes resources in the format “[kind,namespace,name]” where the policy is not evaluated by the admission webhook. For example –filterKind “[Deployment, kyverno, kyverno]” –filterKind “[Deployment, kyverno, kyverno],[Events, *, *]”.generateSuccessEvents: specifies whether (true/false) to generate success events. Default is set to “false”.
Container Flags
The following flags can also be used to control the advanced behavior of Kyverno and must be set on the main kyverno container in the form of arguments.
-v: Sets the verbosity mode of Kyverno log output. Takes an integer from 1 to 6 with 6 being the most verbose.profile: setting this flag to ‘true’ will enable profiling.profilePort: specifies port to enable profiling at, defaults to 6060.metricsPort: specifies the port to expose prometheus metrics, default to port 8000.genWorkers: the number of workers for processing generate policies concurrently. Default is set to 10.disableMetrics: specifies whether (true/false) to enable exposing the metrics. Default is set to ‘false’.backgroundScan: the interval (like 30s, 15m, 12h) for background processing. Default is set to 1h.imagePullSecrets: specifies secret resource names for image registry access credentials.autoUpdateWebhooks: Set this flag to ‘false’ to disable auto-configuration of the webhook. Default is set to ‘true’.imageSignatureRepository: specifies alternate repository for image signatures. Can be overridden per rule viaverifyImages.Repository.webhookRegistrationTimeout: specifies the length of time Kyverno will try to register webhooks with the API server. Defaults to120s.
Policy Report access
During the Kyverno installation, it creates a ClusterRole kyverno:admin-policyreport which has permission to perform all operations on resources policyreport and clusterpolicyreport. To grant access to a Namespace admin, configure the following YAML file then apply to the cluster.
- Replace
metadata.namespacewith Namespace of the admin - Configure
subjectsfield to bind admin’s role to the ClusterRolepolicyviolation
 1apiVersion: rbac.authorization.k8s.io/v1beta1
 2kind: RoleBinding
 3metadata:
 4  name: policyviolation
 5  # change namespace below to create rolebinding for the namespace admin
 6  namespace: default
 7roleRef:
 8  apiGroup: rbac.authorization.k8s.io
 9  kind: ClusterRole
10  name: kyverno:admin-policyreport
11subjects:
12# configure below to access policy violation for the namespace admin
13- kind: ServiceAccount
14  name: default
15  namespace: default
16# - apiGroup: rbac.authorization.k8s.io
17#   kind: User
18#   name:
19# - apiGroup: rbac.authorization.k8s.io
20#   kind: Group
21#   name:
Webhooks
Starting with Kyverno 1.5.0, the mutatingWebhookConfiguration and the validatingWebhookConfiguration resources are registered and managed dynamically based on the configured policies. Prior to 1.5.0, Kyverno uses a wildcard webhook that allowed it to receive admission requests for all resources. With the webhook auto-configuration feature, Kyverno now only receives admission requests for select resources, hence preventing unnecessary admission requests being forwarded to Kyverno.
Additionally, the failurePolicy and webhookTimeoutSeconds policy configuration options allow granular control of webhook settings. By default, policies will be configured to “fail-closed” (i.e. the admission request will fail if the webhook invocation has an unexpected error or a timeout) unless the failurePolicy is set to Ignore.
This feature is enabled by default in 1.5.0+ but can be turned off by flag --autoUpdateWebhooks=false. If disabled, Kyverno creates the default webhook configurations that forwards admission requests for all resources and with FailurePolicy set to Ignore.
The spec.failurePolicy and spec.webhookTimeoutSeconds and policy configuration fields allow per-policy settings which are automatically aggregated and used to register the required set of webhook configurations.
Prior to 1.5.0, by default, the Kyverno webhook will process all API server requests for all Namespaces and the policy application was filtered using Resource Filters and Namespace Selectors discussed below:
Resource Filters
NOTE: In 1.5.0+ resource filters are only used when the autoUpdateWebhooks flag is set to false.
The Kubernetes kinds that should be ignored by policies can be filtered by adding a ConfigMap in namespace kyverno and specifying the resources to be filtered under data.resourceFilters. The default name of this ConfigMap is kyverno but can be changed by modifying the value of the environment variable INIT_CONFIG in the Kyverno deployment spec. data.resourceFilters must be a sequence of one or more [<Kind>,<Namespace>,<Name>] entries with * as a wildcard. Thus, an item [Node,*,*] means that admissions of kind Node in any namespace and with any name will be ignored. Wildcards are also supported in each of these sequences. For example, this sequence filters out kind Pod in namespace foo-system having names beginning with redis.
[Pod,foo-system,redis*]
By default a number of kinds are skipped in the default configuration including Nodes, Events, APIService, SubjectAccessReview, and more.
1apiVersion: v1
2kind: ConfigMap
3metadata:
4  name: kyverno
5  namespace: kyverno
6data:
7  # resource types to be skipped by kyverno policy engine
8  resourceFilters: '[Event,*,*][*,kube-system,*][*,kube-public,*][*,kube-node-lease,*][Node,*,*][APIService,*,*][TokenReview,*,*][SubjectAccessReview,*,*][SelfSubjectAccessReview,*,*][*,kyverno,*][Binding,*,*][ReplicaSet,*,*][ReportChangeRequest,*,*][ClusterReportChangeRequest,*,*]'
To modify the ConfigMap, either directly edit the ConfigMap kyverno in the default configuration inside install.yaml and redeploy it or modify the ConfigMap using kubectl. Changes to the ConfigMap through kubectl will automatically be picked up at runtime.
Namespace Selectors
NOTE: In 1.5.0+ namespace selectors are only used when the autoUpdateWebhooks flag is set to false.
In some cases, it is desired to limit those to certain Namespaces based upon labels. Kyverno can filter on these Namespaces using a namespaceSelector object by adding a new webhooks object to the ConfigMap. For example, in the below snippet, the webhooks object has been added with a namespaceSelector object which will filter on Namespaces with the label environment=prod. The webhooks key only accepts as its value a JSON-formatted namespaceSelector object.
1apiVersion: v1
2data:
3  resourceFilters: '[Event,*,*][*,kube-system,*][*,kube-public,*][*,kube-node-lease,*][Node,*,*][APIService,*,*][TokenReview,*,*][SubjectAccessReview,*,*][SelfSubjectAccessReview,*,*][*,kyverno,*][Binding,*,*][ReplicaSet,*,*][ReportChangeRequest,*,*][ClusterReportChangeRequest,*,*]'
4  webhooks: '[{"namespaceSelector":{"matchExpressions":[{"key":"environment","operator":"In","values":["prod"]}]}}]'
5kind: ConfigMap
6metadata:
7  name: kyverno
8  namespace: kyverno
Upgrading Kyverno
Upgrading Kyverno is as simple as applying the new YAML manifest, or using Helm depending on how it was installed.
Upgrade Kyverno with YAML manifest
Apply the new manifest over the existing installation.
1kubectl apply -f https://raw.githubusercontent.com/kyverno/kyverno/main/definitions/release/install.yaml
Upgrade Kyverno with Helm
Kyverno can be upgraded like any other Helm chart.
Scan your Helm repositories for updated charts.
1helm repo update
Show the versions of the Kyverno chart which are available. To see pre-release charts, add the --devel flag to the helm command.
1helm search repo kyverno
Run the upgrade command picking the target version.
1helm upgrade kyverno kyverno/kyverno --namespace kyverno --version <version_number>
2helm upgrade kyverno-policies kyverno/kyverno-policies --namespace kyverno --version <version_number>
Note
Upgrading to Kyverno 1.5.0+ (Helm chart v2.1.0) from a version between 1.4.2 to 1.4.3 (Helm chart>=v2.0.2 <v2.1.0) will require extra steps.
The step to remove CRDs will cause all Kyverno policies to get removed, so a backup must be taken of policies not added by Helm.
Below are the steps to upgrade Kyverno to 1.5.0 from 1.4.3. The upgrade to 1.5.0+ requires first removing the old CRDs chart.
First take a backup of all cluster policies not added by Helm:
1kubectl get clusterpolicy -l app.kubernetes.io/managed-by!=Helm -A -o yaml > kyverno-policies.yaml
Perform the upgrade
1helm uninstall kyverno --namespace kyverno
2helm uninstall kyverno-crds --namespace kyverno
3helm install kyverno kyverno/kyverno --namespace kyverno --version <version_number>
4helm install kyverno-policies kyverno/kyverno-policies --namespace kyverno --version <version_number>
Restore Kyverno cluster policies
1kubectl apply -f kyverno-policies.yaml
Uninstalling Kyverno
To uninstall Kyverno, use either the raw YAML manifest or Helm. The Kyverno deployment, RBAC resources, and all CRDs will be removed, including any reports.
Option 1 - Uninstall Kyverno with YAML manifest
1kubectl delete -f https://raw.githubusercontent.com/kyverno/kyverno/main/definitions/release/install.yaml
Option 2 - Uninstall Kyverno with Helm
1helm uninstall kyverno-policies kyverno/kyverno-policies --namespace kyverno
2helm uninstall kyverno kyverno/kyverno --namespace kyverno
Clean up Webhook Configurations
Kyverno by default will try to clean up all its webhook configurations when terminated. But in cases where its RBAC resources are removed first, it will lose the permission to do so properly.
Regardless which uninstallation method is chosen, webhooks will need to be manually removed as the final step. Use the below commands to delete those webhook configurations.
1kubectl delete mutatingwebhookconfigurations kyverno-policy-mutating-webhook-cfg kyverno-resource-mutating-webhook-cfg kyverno-verify-mutating-webhook-cfg
2
3kubectl delete validatingwebhookconfigurations kyverno-policy-validating-webhook-cfg kyverno-resource-validating-webhook-cfg